The Eddy Kite
I love making kites with my kids. Here are the instructions

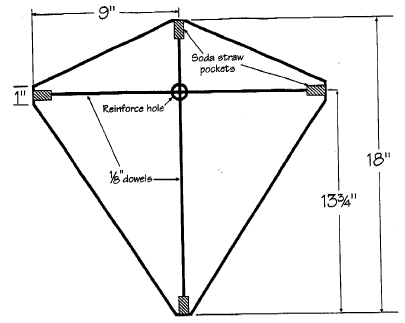
The Eddy kite was “invented” and patented by William A Eddy—- a journalist from Bayonne, New Jersey in 1900. Mr. Eddy was interested in lifting cameras and scientific equipment by kite. The flat kites that were popular in the late 1800s required tails for stability and they were always getting tangled in the gear. To solve this problem he set out to design a “tailless kite”. He found he was able to get the lift and the stability he needed without a tall by simply taking the classic “two-stick” kite and giving it a little bow (or “dihedral”) and raising the spreader. His kite design was used by the U.S. Weather Bureau for early meteorological studies. The sail for the Eddy kite can be made from any number of materials, but kites this size need lightweight material Mylar wrapping paper or plastic trash bags are good choices. This kite is sized to make the best use of a 36” long 1/8” thick dowel rod, but it can be scaled to nearly any size you want – just be sure to scale your dowel rods accordingly.
Directions
1) Cut one dowel rod in half and cut one those pieces in half again. These will become your kite’s “spine” and “spreaders”.
2) Use a 2” piece of rigid tubing to make the spar  connector. Hold the center over a flame for just a few seconds until it is soft enough to bend. Give it about a 15 degree bend this is the kite’s “dihedral” which allows the spine to act like the keel of a boat in the ocean of air. It helps the kite fly straight and steady.
3) Tape the soda straw pockets to each corner of the sail.
4) Insert the spine into the top and bottom pockets.
5) Insert the ends of each of the two shorter spars into the side pockets. Put the spar connector under the spins. Gently bend the spreaders until you can insert them into the connector-be careful at this point you could break a spar or tear your kite. Move the spreaders until the connector is centered in the reinforced hole.
6) Tie your flying line around the spar connector and the spine. (Insert the line from the front of the kite, through the hole, wrap the line around both the connector and the spine, and go back out through the front. Tie a good knot in the front.
The Sled Kite’s
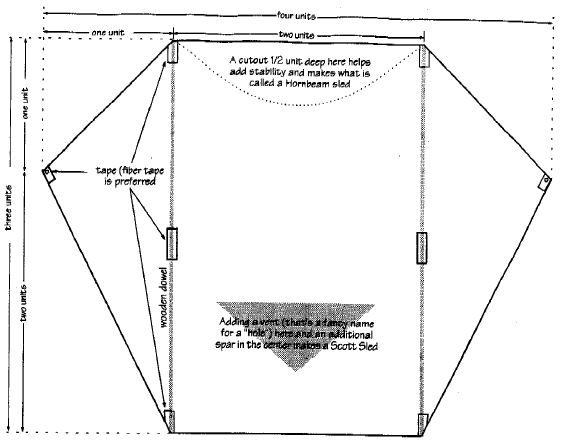
The sled kite is the easiest to build and most reliable all around kite there is. The design was patented by William Allison in the early 1950’s as a “flexible kite”. Frank Scott added the vent and renamed it the “sled kite” in 1964. There are about a zillion variations to the design and you can build a sled kite to any size imaginable, but they all have pretty much the same proportions that we use here. Choose a scale to fit your material. For instance, sled kites are often made from eighteen inch tall plastic shopping bags. To get the best use of the bag, a unit would be six inches and the finished kite would be eighteen inches tall by twenty-four inches wide. To use all of a 48” dowel, an eight inch unit works –that will give you a kite 24” tall by 36” wide so you would use one dowel for each kite.
Some other rules of thumb:
- The bridle line should be cut at least three times the length of the kite. After typing each end of the bridle to the kite, you can find its center by pulling it away from the kite while holding the keels together. Tie a loop at this point and attach your flying line.
- Smaller sleds fly well, bigger kites sometime act goofy. Vents and/or tails will help settle down a skittish kite or help it fly in strong winds.
- Use a 1/8” dowel for kites 18” high and smaller, a 3/16” dowel for a 24” kite. And 1/4” dowels for kites 36” to 48”.
- Remember …. Don’t fly your kite over the street, and stay away from power lines!

Thanks for the printable directions. I am using them with some cub scouts to make 2′ x 3′ tyvak sleds